How to automatically forward transactions from Gmail to Skwad
Apr 20, 2024
NOTE: Forwarding is optional for Gmail users. Learn how to use Skwad's direct Gmail integration.
Managing your personal or business finances means constantly juggling bank statements, credit card bills, and expense receipts. Even with the rise of budgeting apps, organizing and tracking all that financial data can feel like a full-time job.
That's where the power of email forwarding and Skwad's transaction parsing comes in. By setting up some simple inbox rules, you can automatically sync your payment confirmations, income notifications, and expense receipts straight into Skwad's categorized transaction feed. No more manual data entry or receipt hoarding is required!
This guide is for setting up Gmail. Looking for a different email client?
- How to forward transactions from Proton Mail to Skwad
- How to forward transactions from iCloud Mail to Skwad
Here's how to get started:
1. Create Your Skwad Account
Sign up for Skwad to receive your personalized Skwad scan email address, such as "[email protected]." This is your dedicated inbox for syncing various financial notifications.
2. Set Up Email Forwarding Rules in Gmail
Next, you'll want to create email forwarding rules in your Gmail inbox to send key financial alerts to your Skwad Scan addresses automatically:
• The first rule you should set up is for transaction / spend alerts from your bank.
• You can also set up rules for deposits, atm withdrawals, balance changes, and more!
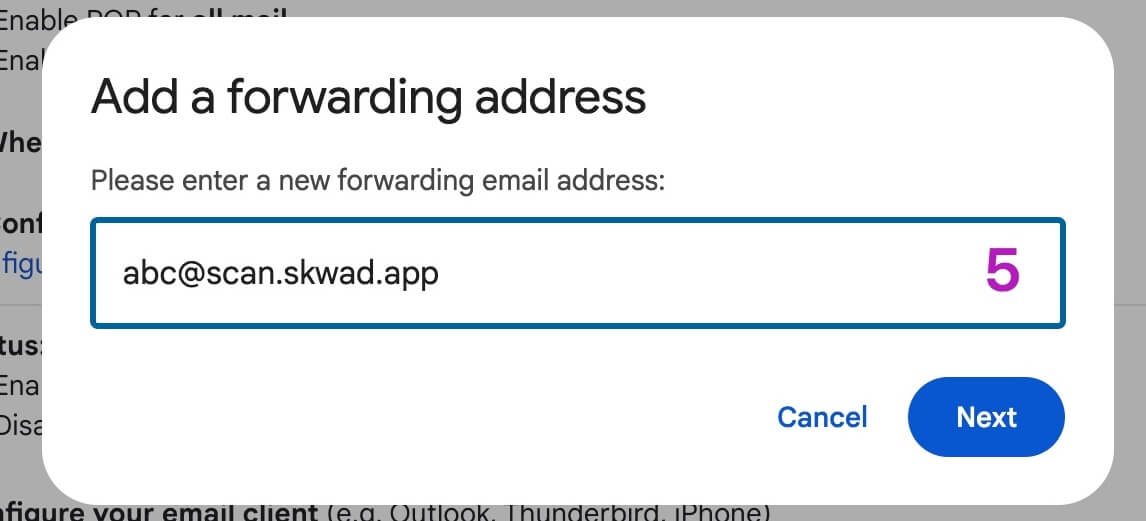
To do this in Gmail, first add a forwarding address
Step 1. Open Gmail and go to Settings > See all settings > Forwarding and POP/IMAP


Replace [email protected] with your own Skwad scan address
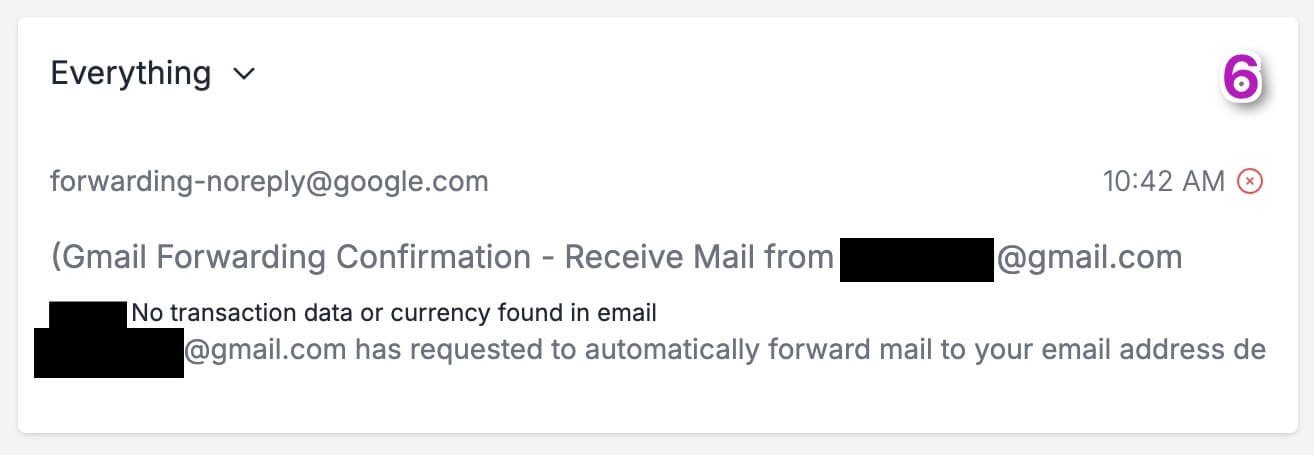
Step 2. Google will send you a verification link to add a new forwarding email. You'll find this link in your Skwad scan inbox. Drawer > Inbox on desktop or More > Inbox on mobile.
Click on the email to expand it. Copy and paste the link in your browser to verify your new forwarding email.

Once verified, you're ready to start forwarding your alerts.
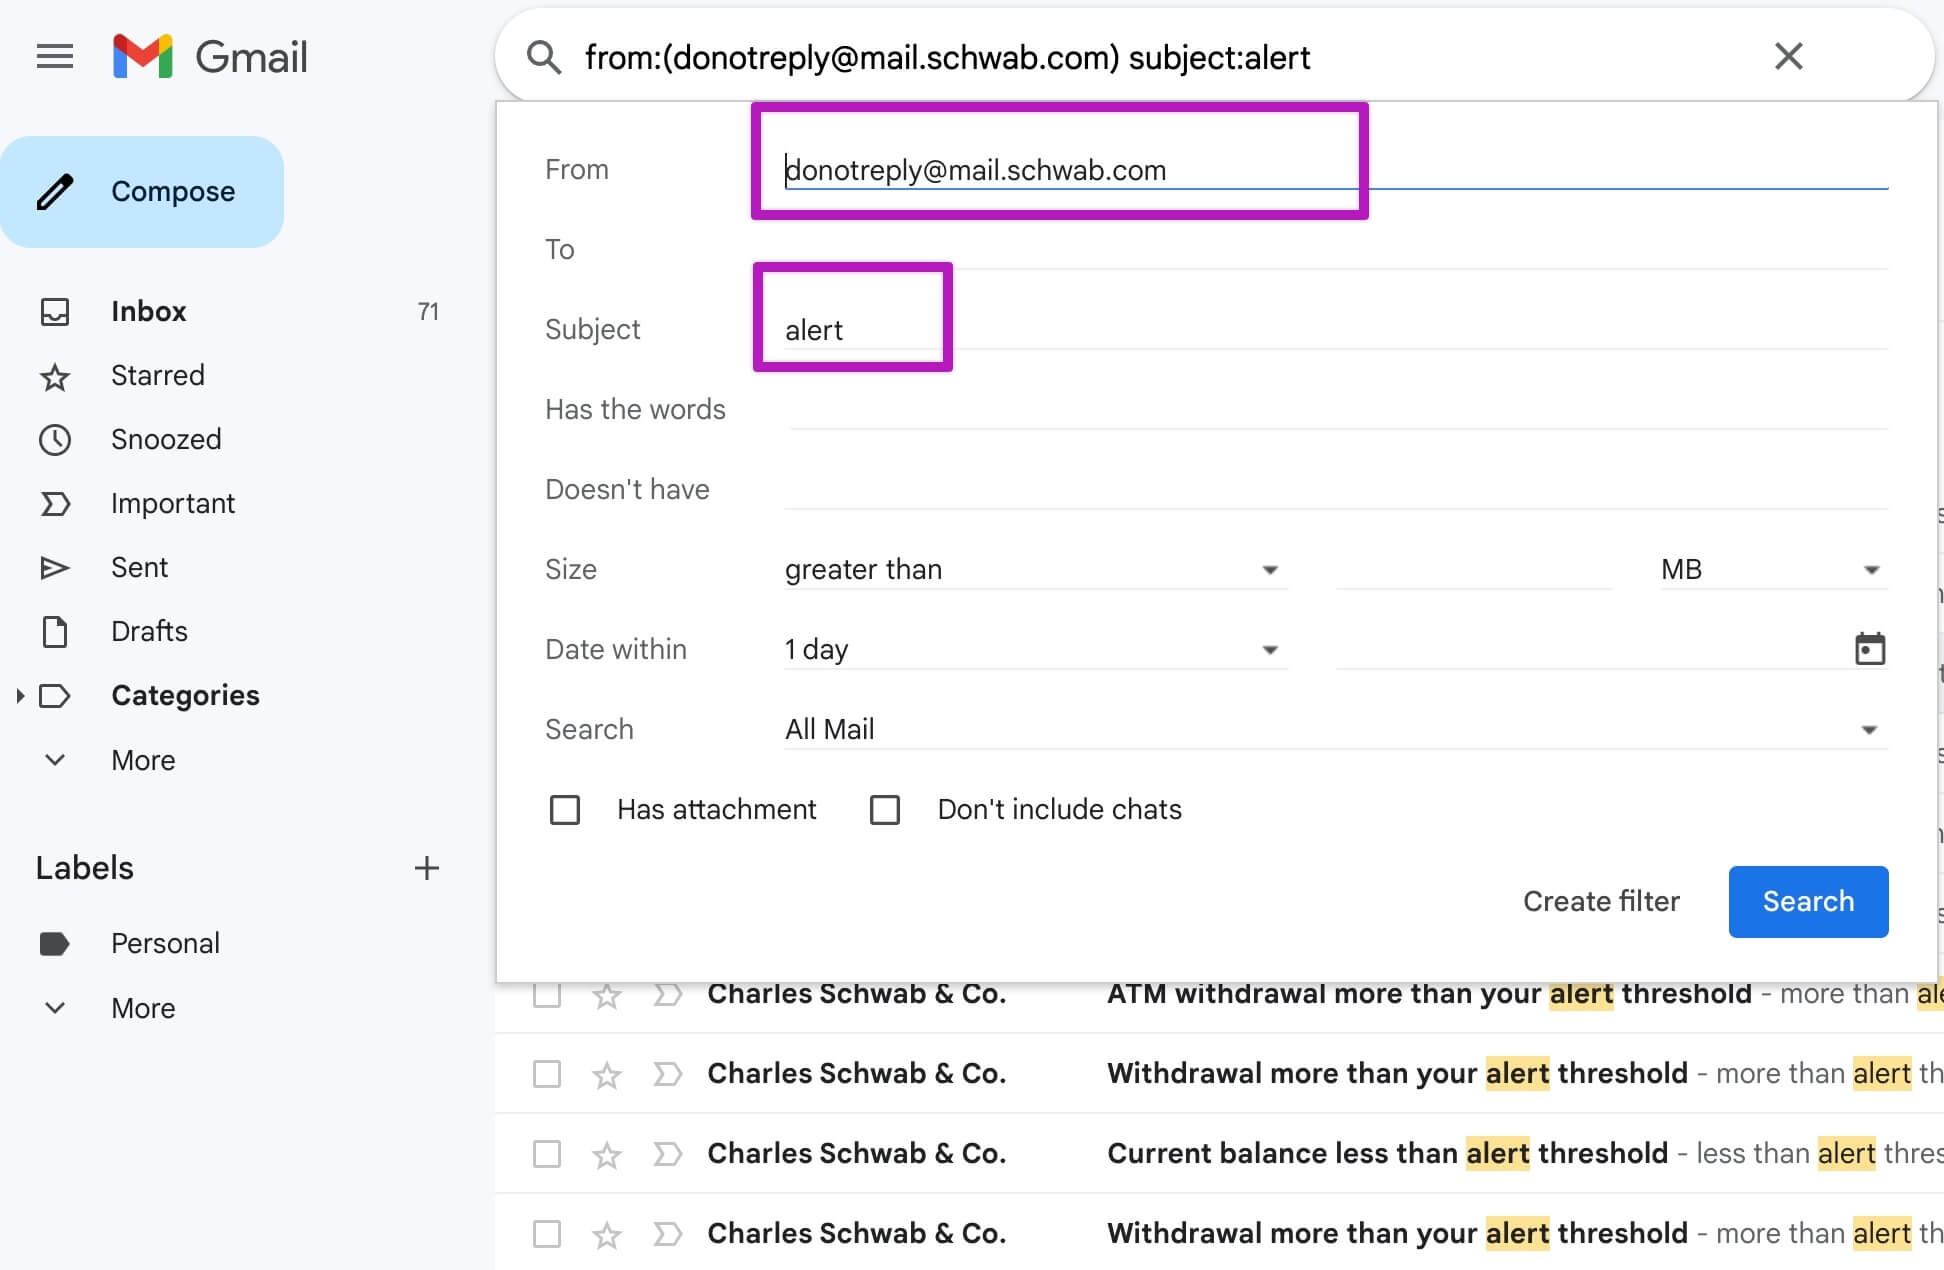
Step 3. Go back to Gmail and click on the icon in the search bar


Here you can create simple filters (1 per bank) or advanced ones that capture all your alerts. Click "Search" to verify what's being filtered.
Note: Skwad will automatically distinguish between transactions and balance updates. All you have to do is forward them.

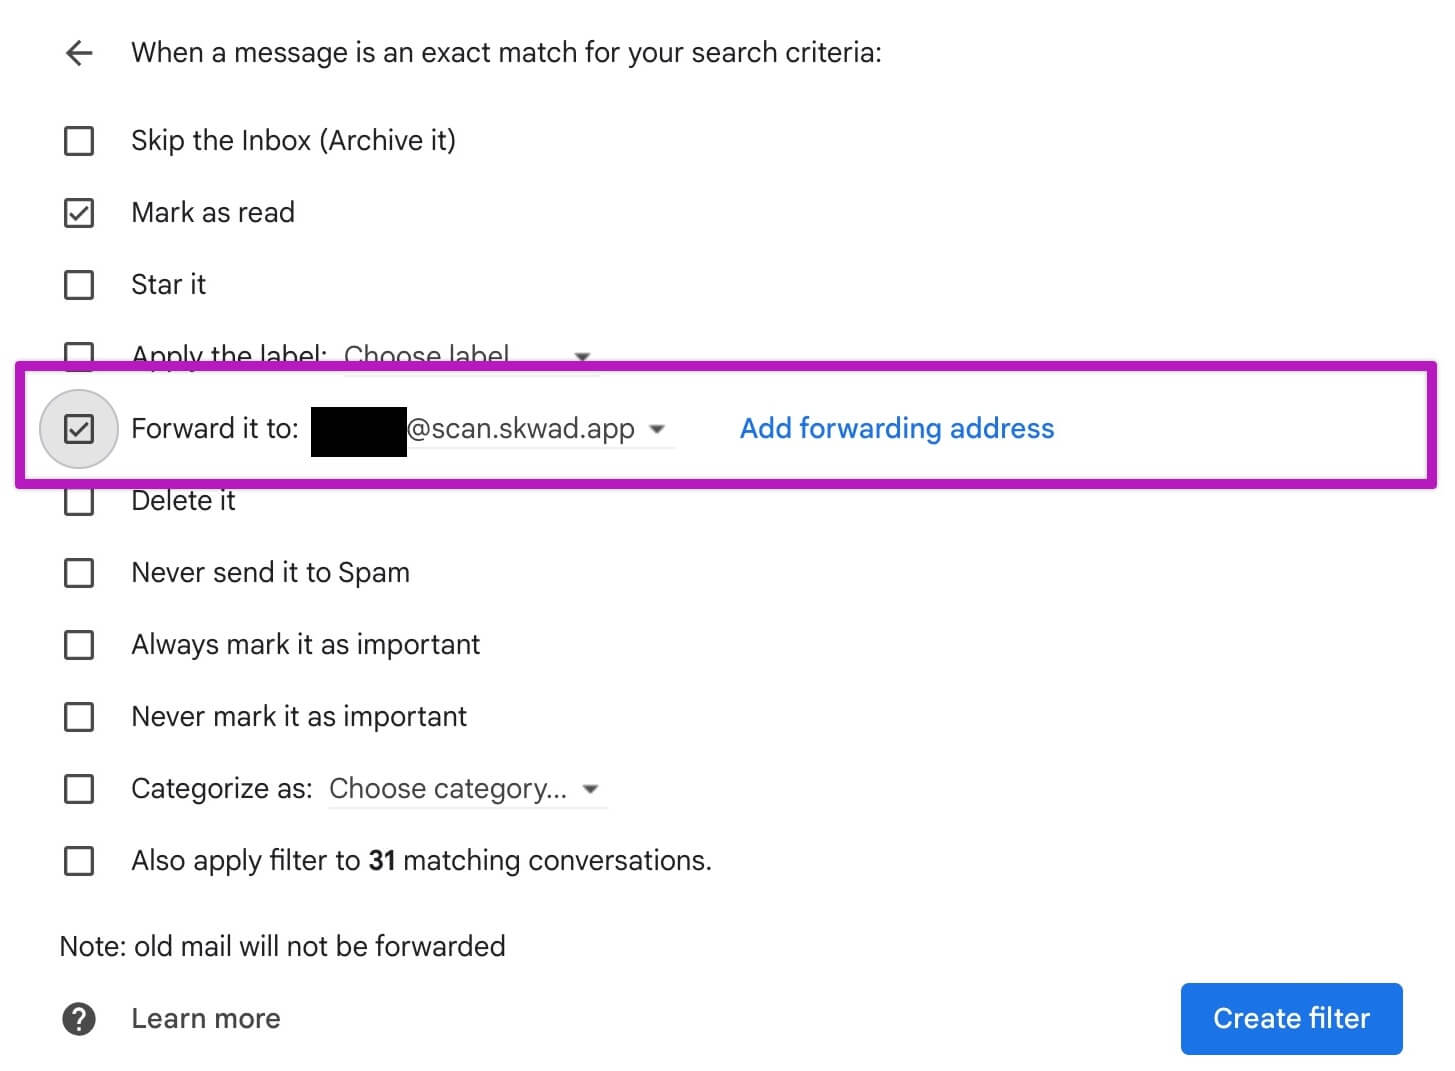
The most important check box is "Forward it to:". Select your skwad scan email, and check the box next to it.
3. Skwad Does the Rest
Once you've set up the forwarding, Skwad's parsing engine starts working. It automatically reads the forwarded emails in your Skwad Scan inboxes, extracts all the critical transaction details like amount, merchant, and date, and categorizes them within your Skwad account.
Just like that, your finances are effortlessly tracked and organized - no manual data entry is required. You can then access your consolidated transaction history and spending analytics within the Skwad app or sync to Google Sheets.
Get a better understanding of your finances today.
Start your 15-day trial
More posts
- Optum Bank Prioritizes Customer Security, Discontinues Support for Third-Party Financial Data Aggregators
- Skwad's Spend Tracking In Google Sheets
- How Skwad Scan Inboxes Automate Your Financial Life
- Creating Skwad transactions using iOS Shortcuts
- Skwad's Receipt Scanner: A Comprehensive Guide to Expense Tracking
- Is It Safe To Connect Your Bank Account To Budgeting Apps? Are Budgeting Apps Safe To Use?


© 2026 TCS Digital, LLC.
Created and hosted in the USA 🇺🇸
Data encrypted & stored with AWS 🔒
Bootstrapped & funded by our users.
Resources
Skwad bookFree bank transaction categorizerHow to setup auto import without bank linkingBank linking with 11,000+ financial institutionsHow to auto sync transactions to Google SheetsHow to import old transactions
